
How to Plant a Privet Hedge: Step-by-Step UK Guide
Privet is a vigorous and adaptable hedging plant that can establish quickly when it is planted at the correct depth, spaced according to the chosen plant size and watered carefully while its roots develop. Autumn and spring usually provide the easiest planting conditions, although pot-grown Privet can be planted throughout the year when the ground is workable and reliable watering is available.
This guide explains how to prepare the planting line, calculate the number of plants required and plant bare-root, pot-grown, root-balled and instant Privet correctly. It also covers watering, mulching, formative pruning and the most common mistakes to avoid.
For broader advice covering Privet varieties, ongoing watering, feeding, pruning and common problems, read our complete Privet Hedge Care Guide .
Privet planting guide contents
Privet planting summary
| Planting point | Practical guidance |
|---|---|
| Best planting period | Autumn and spring usually provide the easiest establishment conditions. |
| Pot-grown Privet | Can be planted throughout the year when the soil is workable and sufficient water is available. |
| Bare-root Privet | Plant during the dormant season, normally from November into early spring. |
| Root-balled Privet | Plant from autumn to early spring while the plants are dormant and the ground is workable. |
| Position | Full sun or partial shade. Golden Privet normally develops its strongest foliage colour in good light. |
| Soil | Most moist but well-drained garden soils. Avoid persistently waterlogged ground. |
| Planting depth | Plant at the same depth as before. The top of the root system should finish level with the surrounding soil. |
| Typical spacing | Approximately two to six plants per metre, depending on variety, height and root type. |
| Watering | Water thoroughly after planting and whenever the root zone begins to dry during establishment. |
| Mulching | Apply a 5–7cm layer over the root zone while keeping mulch clear of the stems. |
| Initial pruning | Remove damaged growth and use formative pruning where appropriate to encourage low branching. |
Choosing the right Privet for your hedge
Privet varieties differ in foliage colour, growth rate, wildlife value, winter leaf retention and the root types available. Choose the variety before calculating the number of plants because the recommended density varies between products and sizes.
Common Privet
Common Privet is generally the best choice for a fast-growing, dense and regularly clipped boundary. It has dark green foliage and is usually semi-evergreen in UK gardens, retaining more leaves in mild, sheltered conditions and losing more during cold or exposed winters.
Common Privet is available in the widest range of formats, including bare root, pot grown, root ball and instant hedging. This makes it suitable for economical long hedge lines as well as projects requiring more immediate height.
Golden Privet
Golden Privet has green foliage edged with golden yellow. It is normally slower-growing than Common Privet and works well where a brighter, more ornamental formal hedge is required.
The golden colour is usually strongest in a sunny position. Golden Privet tolerates partial shade, but the foliage can become greener where light levels are low.
Wild Privet
Wild Privet is a native choice suited to informal boundaries, wildlife gardens and mixed rural planting. It is naturally more deciduous or semi-evergreen and can produce fragrant flowers followed by black berries when it is not clipped too closely.
Wild Privet can still be maintained as a formal hedge, but less frequent trimming will preserve more of its flowering and fruiting growth.
Griselinia is sometimes called New Zealand Privet, but it is not a true Privet and belongs to a different plant family. It should not be treated as another Ligustrum variety when planning a Privet hedge.
When is the best time to plant Privet hedging?
Autumn and spring are usually the easiest times to establish Privet because temperatures are moderate and the soil is more likely to remain naturally moist. The exact planting season depends on whether the plants are pot grown, bare root, root balled or supplied as instant hedging.
Planting pot-grown Privet
Pot-grown Privet can be planted throughout the year, provided the ground is not frozen, waterlogged or baked hard by drought. Plants installed during spring or summer require closer moisture monitoring because the original potting compost can dry more quickly than the surrounding garden soil.
Water the pot thoroughly before planting. During warm weather, prepare the entire planting line before removing plants from their containers so the roots are not left exposed unnecessarily.
Planting bare-root Privet
Bare-root Common and Golden Privet are normally supplied between November and early spring while the plants are dormant. They should be planted as soon as reasonably possible after delivery.
Keep the roots covered, cool and moist until each plant is placed in the ground. Never leave bare roots exposed to direct sun or drying wind. When planting must be delayed, temporarily heel the roots into loose soil in a sheltered position rather than storing them dry.
Planting root-balled Privet
Root-balled Common Privet is normally available from autumn to early spring. The plants are lifted with a substantial ball of field soil around their roots, allowing larger specimens to be moved while dormant.
Handle each plant from beneath the root ball rather than pulling or lifting it by the stem. Keep the root ball moist before planting and avoid allowing it to freeze or dry out.
Planting instant Privet hedging
Instant Privet is supplied in established metre-long units. It can provide an immediate hedge structure but has a much larger root mass than individual young plants and therefore requires thorough soil preparation and dependable watering.
Autumn and spring provide favourable conditions, but instant hedging can be installed at other times where the soil is workable and a suitable irrigation system is operating.
When should planting be postponed?
Delay planting when:
- The ground is frozen solid.
- Water is standing in the planting trench.
- Wet clay smears into a compacted paste when handled.
- The soil is extremely dry and reliable irrigation is not available.
- Strong drying winds would leave bare roots exposed during the work.
- Severe heat would place large pot-grown, root-balled or instant plants under unnecessary stress.
A cool, still and overcast day is often preferable, particularly when planting bare-root stock.
Where should a Privet hedge be planted?
Sunlight
Privet grows in full sun or partial shade. Common and Wild Privet generally tolerate partial shade well, although any hedge may become thinner where light levels are very low.
Golden Privet normally develops its brightest colour in good light. In a heavily shaded position, the yellow margins may become less prominent and the hedge may grow more slowly.
Soil and drainage
Privet grows in a wide range of ordinary garden soils provided excess water can drain away. Moist but well-drained loam is ideal, but established plants can tolerate clay and lighter sandy soils when these are prepared and managed appropriately.
Do not dismiss every clay or sandy site as unsuitable. Instead, assess how the complete planting line behaves:
- Heavy clay: relieve compaction over a broad strip and avoid planting while the ground is saturated.
- Light sandy soil: incorporate suitable organic matter and expect to water more frequently during dry weather.
- Compacted construction soil: loosen the complete rooting area rather than creating small isolated planting holes.
- Waterlogged ground: correct the drainage or choose a more suitable planting position before installing the hedge.
Routine pH testing is not normally required for Privet in an established garden unless there is a known soil problem or previous planting has performed poorly.
Distance from walls, fences and paving
Leave sufficient room to plant, water and trim both sides of the mature hedge. The correct distance depends on the intended final width, nearby foundations, access requirements and whether the boundary owner can maintain the far side.
Do not squeeze the stems tightly against a solid fence. Rain shadows beside walls and fences can also leave the root zone drier than the rest of the garden, so check soil moisture even after light rain.
Existing trees and mature shrubs
Privet can tolerate some shade, but planting directly beneath established trees creates competition for moisture, nutrients and rooting space. The new hedge may require more intensive watering and can remain thinner where tree roots dominate the soil.
Underground and overhead services
Before digging, check the intended line for water pipes, electricity cables, drainage, irrigation, lighting and other buried services. Consider overhead wires and future access where a tall hedge is planned.
Privet hedge spacing and plants per metre
There is no single correct spacing for every Privet hedge. Plant height, root type and the density already present at delivery all affect the number required.
The following figures reflect current Hedging Plants Direct product examples. Always use the calculator on the selected live product page as the final specification because sizes and available formats can change.
| Plant and format | Plants per metre | Approximate centre spacing |
|---|---|---|
| Common Privet bare root, 40–60cm | 6 | About 17cm |
| Common Privet bare root, 60–120cm | 5 | 20cm |
| Common Privet pot grown, 60–80cm | 4 | 25cm |
| Common Privet pot grown, 80–125cm | 3 | About 33cm |
| Common Privet root ball, 100–150cm | 3 | About 33cm |
| Common Privet root ball, 150–225cm | 2 | 50cm |
| Common Privet instant hedging | 1 metre-long unit | One unit per metre |
| Golden Privet bare root, 40–60cm | 5 | 20cm |
| Golden Privet pot grown, 40–60cm | 4 | 25cm |
| Wild Privet pot grown, 80–100cm | 3 | About 33cm |
How to calculate the number of Privet plants required
Measure the complete hedge line in metres and subtract gates, paths and other permanent openings. Multiply the remaining length by the recommended plants per metre for the chosen product.
For example, a 10m hedge using 40–60cm bare-root Common Privet at six plants per metre requires:
10 metres × 6 plants = 60 plants
The same 10m hedge using a pot-grown option planted at three per metre requires:
10 metres × 3 plants = 30 plants
Measure curves along the actual planting line rather than using the straight distance between the two ends.
Should Privet be planted in a single or double row?
A single row is normally sufficient for a formal Privet hedge because the plants branch freely and respond well to formative trimming.
A staggered double row may be used where a broad landscape hedge or greater physical depth is required, but it uses more plants and occupies more space. Do not simply double the normal single-row density without considering the intended width, maintenance access and site specification.
How to prepare the Privet planting line
1. Mark the route
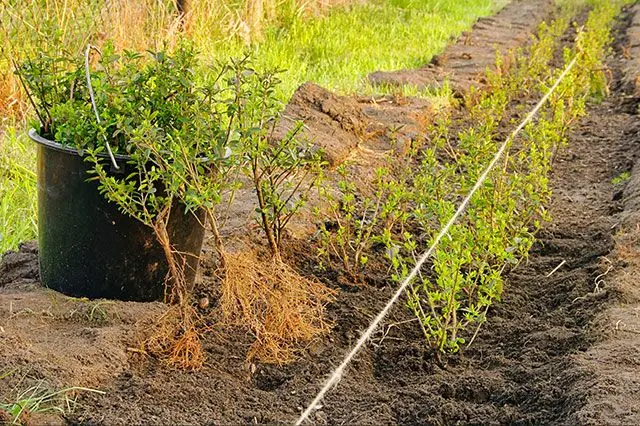
Use a string line for a straight hedge or a hose for a curved boundary. Mark gates, corners and changes in level before digging.
Check the line from both ends and from the main viewing position. Correcting it after the plants have been installed is much more difficult.
2. Remove turf, weeds and debris
Clear a continuous strip along the planting line. Remove perennial weeds, grass, large stones, old roots and building debris.
Do not leave a narrow collar of grass around each young plant. Grass competes strongly for moisture and can make establishment more difficult, particularly for small bare-root stock.
3. Relieve compaction
Loosen the complete rooting strip rather than digging a series of narrow, polished holes. Break up compacted sides and the base with a fork without creating an unnecessarily deep trench.
On heavy clay, avoid working the soil while it is saturated because this can damage its structure and create smooth surfaces that restrict root movement.
4. Improve poor soil where necessary
Blend suitable organic matter with the excavated soil where the ground is very sandy, low in organic matter or structurally poor. Use a peat-free soil improver rather than peat moss.
Our peat-free Hedge Planting Compost can be incorporated to improve soil structure and moisture management. It should be mixed with the existing soil rather than used to create a complete pocket of compost around the roots.
Do not automatically add large quantities of rich material to already fertile or well-structured soil. The objective is a broad, consistent rooting environment rather than a narrow planting trench that behaves differently from the surrounding ground.
5. Prepare the plants
- Water pot-grown plants thoroughly before removing their containers.
- Moisten root balls slowly so water reaches their centre.
- Keep bare roots wrapped until immediately before planting.
- Remove damaged roots with clean, sharp secateurs.
- Set the plants beside the trench at the correct intervals before backfilling.
6. Consider mycorrhizal fungi
An optional mycorrhizal product such as Rootgrow can be applied at planting according to its label. The product should make direct contact with the roots rather than being scattered where roots cannot reach it.
Follow the product instructions carefully and avoid assuming that a planting additive can compensate for poor drainage, incorrect planting depth or inadequate watering.
Tools and materials needed to plant Privet
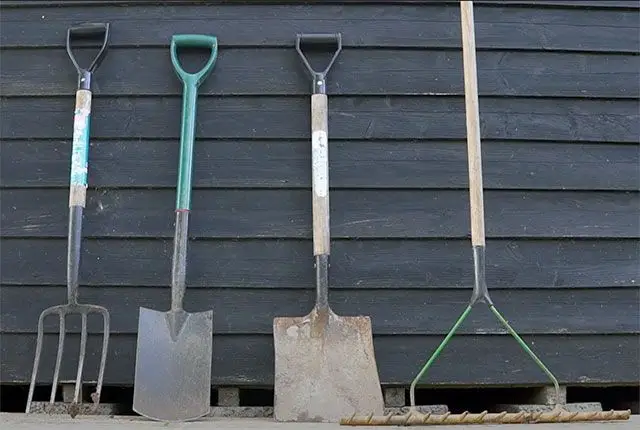
Depending on the size and format of the plants, useful equipment includes:
- String line, canes and measuring tape
- Spade or trenching shovel
- Garden fork for loosening compacted soil
- Wheelbarrow
- Clean secateurs for damaged roots or shoots
- Watering hose or suitable irrigation system
- Watering cans where a hose cannot reach
- Peat-free soil improver where required
- Organic mulch
- Mycorrhizal fungi where chosen
- Gloves and suitable footwear
- Stakes and flexible ties for substantial plants in exposed positions
Larger root-balled and instant hedging may require lifting equipment, additional labour or mechanical excavation. Plan access before delivery rather than moving substantial plants manually across an unsuitable site.
How to plant a Privet hedge step by step
1. Position the plants
Place the plants along the prepared line using the density shown for the selected product. Distribute them evenly rather than placing the first plants too close together and leaving a large gap at the end.
For a formal hedge, use the string line to keep the stems aligned. Turn the best-developed side towards the main viewpoint where appropriate.
2. Dig the trench or planting holes
For a long hedge, a continuous trench often makes spacing and soil preparation easier. For a short run or widely spaced substantial plants, individual holes may be suitable.
The trench should be wide enough for roots to spread naturally but generally no deeper than the existing root system or root ball. Digging excessively deep and filling the bottom with loose material can allow plants to sink after watering.
3. Check the planting depth
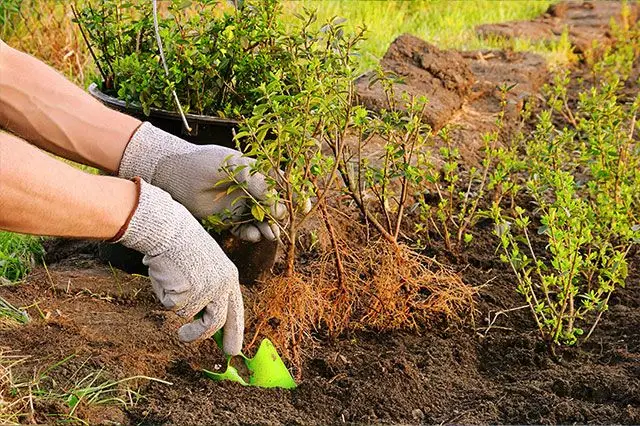
Privet should be planted at approximately the same depth at which it was previously growing.
- On a pot-grown plant, the top of the root ball should finish level with the surrounding soil.
- On a root-balled plant, the top of the root ball should also remain level with the finished ground.
- On a bare-root plant, use the original soil mark or change in stem colour as a guide.
Do not bury the lower stem beneath a deep layer of soil or compost. Equally, do not leave the upper roots exposed after the ground has settled.
4. Prepare the roots
Remove containers completely. Loosen tightly circling outer roots on pot-grown plants so they are encouraged to grow into the surrounding soil.
Spread bare roots naturally across loosened soil. Do not fold long roots upwards or force them into a narrow hole. Trim only damaged ends or an occasional root that cannot be positioned correctly.
Keep a root-balled plant intact. Follow the supplied instructions for natural hessian, wire or other wrapping and loosen any tight material around the stem.
5. Hold each plant upright
Check the plant from the front and along the hedge line. It should be upright at the correct depth before backfilling begins.
Where the ground slopes, maintain consistent planting depth relative to the local soil level rather than burying plants at the lower end to create an artificially level root line.
6. Backfill around the roots
Return the excavated soil gradually, working it carefully between and around the roots. Mix any soil improver through the backfill rather than concentrating it in one layer.
For bare-root plants, gently shake each plant as soil is added so fine material settles around the smaller roots. Avoid leaving large air pockets.
7. Firm the soil carefully
Firm the soil with your heel or hands sufficiently to stabilise the plant, but do not compact the surface into a hard, impermeable layer.
Check the line and planting depth again. Correct leaning or sunken plants before the trench is completely finished.
8. Water thoroughly
Water immediately after planting, even when the soil already feels damp. Apply water slowly across the entire root zone so it reaches the original root ball or bare-root area as well as the surrounding soil.
Watering settles soil around the roots and can reveal plants that are too deep, unstable or poorly firmed. Recheck the complete hedge afterwards.
9. Apply mulch
Spread a 5–7cm layer of suitable organic mulch over the prepared strip. Leave a clear gap immediately around each stem rather than piling mulch against the bark.
Our Hedge Bio Mulch can help reduce weed growth and slow moisture loss from the soil.
10. Install protection or support where necessary
Young plants may require protection from rabbits, deer, livestock, strimmers or accidental damage. Guards should not rub against the stems or trap excessive damp growth.
Substantial pot-grown and root-balled plants may need temporary support in an exposed position. Secure the root system without holding the stems so rigidly that they cannot move naturally.
11. Begin an establishment record
For longer, trade or commercial hedge projects, record:
- The planting date
- Plant size and root type
- Weather and soil conditions
- Watering completed
- Any damaged or substituted plants
- The irrigation system and test results
This makes it easier to identify patterns if part of the hedge establishes differently from the rest.
Planting Privet by root type
How to plant bare-root Privet
Keep bare roots covered until the planting trench is ready. Shortly before planting, soak or thoroughly wet the roots so they are fully hydrated, but do not leave them submerged for a prolonged period.
Spread the roots naturally across loosened soil and use the original soil mark on the stem to judge depth. Backfill in stages, gently shaking the plant so soil settles between the fine roots.
Firm, water and mulch the line immediately. Bare-root plants have little surrounding soil to act as a moisture reserve, so weed control and careful watering are particularly important during the first growing season.
How to plant pot-grown Privet
Saturate the potting compost before planting. Remove the container and inspect the root ball. Tease out tightly circling roots and trim any that are dead or badly damaged.
Position the top of the root ball level with the surrounding soil. After planting, check the original pot-shaped root ball itself for moisture because it can dry at a different rate from the surrounding ground.
How to plant root-balled Privet
Lift root-balled Privet from beneath the ball rather than by the stem. Keep the root ball intact and set its upper surface level with the finished soil.
Natural hessian is commonly left around the root ball where this is specified, although tight ties around the stem should be loosened or removed. Follow the instructions supplied with the selected plants.
Apply water slowly so it penetrates the dense root ball. Wet soil surrounding the plant does not necessarily mean the centre of the ball has received enough water.
How to plant instant Privet hedging
Prepare a level trench for the full run. The base should support each unit evenly rather than leaving hollow sections beneath the root system.
Position metre-long units closely enough to create a continuous hedge without forcing the root systems to overlap. Backfill beneath and between each unit and firm carefully.
Install and test a suitable hedge irrigation system along the root zone. Check several positions, including the far end of the line, rather than assuming that visible water near the connection proves the whole system is working.
How to water a newly planted Privet hedge
Watering should respond to the actual moisture within the root zone rather than a fixed rule such as once per week. Weather, soil type, plant size, exposure and root format all affect how quickly a new hedge dries.
Immediately after planting
Water slowly and thoroughly across the complete root zone. The aim is to moisten the roots and adjacent soil, not simply wet the surface.
Check the line after watering. Lift and reset any plant that has sunk too deeply and firm any that has become loose.
During the first growing season
Check moisture regularly during dry weather. Push a finger, trowel or soil probe beneath the mulch and into the original root ball where possible.
Increase checks during:
- Hot weather
- Strong or persistent wind
- Prolonged periods without useful rainfall
- Spring and summer growth
- Planting in sandy soil
- Planting beside walls, paving or mature trees
- Establishment of large root balls or instant hedge units
Deep watering that reaches the complete root system is more useful than frequent light sprinkling that only moistens the surface.
During the second growing season
The roots should begin extending into the surrounding ground, but the hedge can still be vulnerable during prolonged drought. Continue checking and watering where necessary, especially in exposed positions and rain shadows.
Reduce watering gradually as the plants establish rather than stopping on a fixed date.
Avoiding overwatering
Do not continue watering saturated soil. Symptoms associated with drought and waterlogging can appear similar because damaged roots are unable to supply the foliage properly.
Investigate drainage if water remains in the trench, the soil smells stagnant or plants repeatedly decline despite frequent watering.
Mulching and feeding after planting
Mulching
Mulch helps suppress competing weeds and slows evaporation from the soil. Apply it over moist ground after the hedge has been watered.
Maintain a clear area around each stem. Mulch piled directly against the bark can retain excessive moisture and conceal damage.
Check beneath the mulch before watering. A dry surface does not always mean the soil below is dry, while damp mulch can sometimes hide a dry original root ball.
Feeding
Do not assume that every newly planted Privet hedge requires fertiliser immediately. Good planting depth, healthy soil structure, suitable moisture and weed control are more important during early establishment.
Where a soil assessment or weak growth indicates that feeding is appropriate, apply a suitable hedge fertiliser in spring according to its label.
Avoid automatic high-nitrogen feeding late in summer or autumn because it can encourage soft growth that has insufficient time to mature before colder weather.
Should Privet be pruned after planting?
Formative pruning helps young Privet plants develop side branches and a dense base. The amount removed should depend on the size, root type and existing framework of the supplied plants.
Small bare-root Privet may benefit from stronger formative shortening where this is recommended in the nursery or project specification. Larger pot-grown, root-balled and instant plants should not automatically be cut back hard.
Remove broken and damaged shoots, lightly shorten straggly growth and build the final hedge height gradually. Keep the base at least as wide as the top so light can reach the lower branches.
For detailed techniques and seasonal timings, read our guide to how and when to prune a Privet hedge .
Privet hedge care during the first year
Keep the planting strip weed-free
Prevent grass and perennial weeds from growing through the root zone. Hand weed or use a method suitable for the site without damaging young stems or roots.
Check the plants after strong wind
New plants can loosen before their roots secure them. Firm loose soil and correct leaning plants promptly. Check stakes and ties on larger stock and adjust anything rubbing against the stems.
Monitor irrigation
Inspect pipes, connectors, valves and outlets regularly. Where porous or drip irrigation is used, check moisture beneath several sections of the line rather than judging performance from the first outlet.
Watch for damage
Check for rabbit or deer browsing, strimmer injuries, broken branches and damage from people, pets or construction activity.
Replace failures promptly
Allow newly planted Privet time to break dormancy in spring before declaring bare-root plants dead. Where a plant has genuinely failed, investigate the likely cause before installing a replacement in the same position.
Begin shaping gradually
Encourage branching while the hedge is young. Do not allow a few vigorous upright stems to gain height while the lower section remains sparse.
Frequently asked questions about planting Privet
What is the best month to plant a Privet hedge?
Autumn and early spring usually provide favourable conditions because temperatures are moderate and the soil is naturally moist. Bare-root and root-balled Privet are planted during the dormant season. Pot-grown Privet can be planted throughout the year when the ground is workable and sufficient water is available.
How far apart should Privet plants be?
Spacing depends on the size and root type. Current Hedging Plants Direct examples range from six plants per metre for small bare-root Common Privet to two per metre for substantial root balls. Use the calculator on the selected product page as the final specification.
How many Privet plants do I need for a 10m hedge?
Multiply 10m by the density for the selected product. At six plants per metre, a 10m hedge requires 60 plants. At three plants per metre, it requires 30 plants.
Should I dig individual holes or one trench?
A continuous trench is usually easier for a long formal hedge because it allows consistent spacing, depth and soil preparation. Individual holes may be suitable for a short row or substantial plants positioned farther apart.
How deep should Privet be planted?
Plant Privet at the same depth it was growing previously. The top of a pot-grown or root-balled root system should finish level with the surrounding soil. Use the old soil mark on a bare-root stem as a guide.
Should bare-root Privet be soaked before planting?
Rehydrate the roots shortly before planting by soaking or thoroughly wetting them. Keep them covered until the trench is ready and do not leave them exposed to sun or drying wind.
Can Privet be planted in clay soil?
Yes, provided the ground is not persistently waterlogged. Prepare a broad planting strip, relieve compaction and avoid working saturated clay into a smooth paste.
Can Privet be planted in sandy soil?
Yes. Incorporate suitable organic matter to improve soil structure and moisture retention, then monitor watering closely during establishment because sandy soil can dry quickly.
Does Privet need full sun?
Privet grows in full sun or partial shade. Common and Wild Privet generally tolerate partial shade well. Golden Privet normally develops stronger colour where it receives more light.
Should compost be added when planting Privet?
Compost can help improve very sandy, compacted or structurally poor soil. Use a peat-free soil improver and blend it with the excavated soil rather than filling the complete trench with compost.
Can I use RootGrow when planting Privet?
A mycorrhizal product can be applied according to its label and should make direct contact with the roots. It remains optional and does not replace correct soil preparation, planting depth or watering.
Should fertiliser be placed in the planting hole?
Do not place concentrated fertiliser directly against the roots unless a product is specifically designed and labelled for that use. Newly planted Privet does not always require immediate feeding.
How much water does a new Privet hedge need?
There is no fixed quantity suitable for every plant and site. Water thoroughly after planting and check the root zone regularly. Larger plants, sandy soil, wind and warm weather usually increase demand.
Why is my newly planted Privet losing leaves?
Some leaf loss can occur after transplanting or during cold weather because Privet is semi-evergreen rather than reliably evergreen. Check planting depth, root-zone moisture and drainage. Persistent dieback, loose bark or blackened roots may indicate a more serious problem.
Can I plant Privet beside a fence?
Yes, but leave enough room for the intended hedge width and future trimming. Check the soil carefully because the area beside a solid fence may lie within a rain shadow.
Should Privet be planted in a double row?
A single row is normally sufficient for a formal garden hedge. A staggered double row may suit a broad landscape specification, but it requires more space and plants.
Can I plant Privet where an old hedge was removed?
Remove as much old woody material as practical, investigate why the previous hedge failed and improve the rooting area. Severe compaction, waterlogging, disease or large remaining roots should be addressed before replanting.
Choose your Privet hedge plants
Explore our complete Privet hedging range to compare current sizes, prices, root types and planting densities.
For advice beyond planting, including watering through the first two seasons, feeding, pruning, winter foliage, pests and diseases, visit our Privet Hedge Care Guide .