
How to plant a Laurel Hedge - A Complete Guide
Correct planting gives a new Laurel hedge the best chance of establishing into a dense, healthy evergreen screen. The most important factors are preparing the whole planting strip, using the correct spacing for the plants you have ordered, planting at the original growing depth and keeping the root area consistently moist without leaving it waterlogged.
This step-by-step guide explains how to plant pot-grown, bare-root, root-balled and instant Laurel hedging in UK gardens and landscaping projects. It also covers soil preparation, planting depth, spacing, watering, mulching and early aftercare.
For advice extending beyond planting, including variety selection, growth rates, feeding, pruning and common problems, read our complete Laurel Hedging Care Guide.
You can also buy laurel hedging plants and check the recommended number of plants per metre for each available size.
Planting guide contents
Watch how to plant a Laurel hedge
Our video provides a practical demonstration of the main planting process. The written guide below adds more detailed advice for the different Laurel varieties, plant sizes and root types.
| Planting factor | Recommended approach |
|---|---|
| Best planting period | Early autumn to early spring is normally easiest. Pot-grown Laurel can be planted at other times if the ground is workable and reliable watering is available. |
| Planting depth | Plant at the same depth as the plant was growing previously. Do not bury the stem or root collar. |
| Plant spacing | Use the plants-per-metre recommendation shown for the exact Laurel variety, size and root type. |
| Soil | Moist but well-drained ground. Improve compacted or poorly drained soil across the wider planting strip. |
| Watering | Water thoroughly after planting, then check moisture below the surface and water again when the root area begins to dry. |
| Mulching | Apply a 5–8cm layer of organic mulch while keeping it clear of the stems. |
| Feeding | Do not place concentrated fertiliser against the roots. Apply a suitable spring top dressing later where soil or plant condition indicates it is needed. |
When is the best time to plant a Laurel hedge?
Early autumn to early spring is generally the easiest time to plant Laurel hedging in the UK. Cooler conditions reduce water loss from the foliage, and rainfall is normally more reliable than it is during late spring and summer.
The exact planting season depends on how the plants are supplied.
Pot-grown Laurel
Pot-grown Laurel can normally be planted throughout the year, provided the soil is workable and you can supply enough water during dry weather. Autumn and early spring are usually easier because the plants experience less heat and drought stress.
Summer planting is possible, but newly planted evergreens can lose a considerable amount of moisture through their leaves. Large pot-grown plants, dry sandy soil and exposed sites create a particularly high watering requirement.
Bare-root Laurel
Bare-root Cherry Laurel and Portuguese Laurel are seasonal plants supplied while dormant, normally from late autumn to early spring. Plant them promptly after delivery and keep the exposed roots covered and moist throughout handling.
Do not leave bare roots uncovered in the sun or wind while setting out a long hedge. Work in manageable sections and return unused plants to their protective packaging until they are needed.
Root-balled Laurel
Root-balled Cherry Laurel, Portuguese Laurel and Upright Laurel are lifted from the field during dormancy. They should be planted as soon as practical after delivery, with the retained soil ball kept intact and moist.
Larger root-balled plants provide more immediate height and coverage, but their substantial evergreen leaf area means careful watering and secure handling are essential.
Instant Laurel hedging
Instant hedging may be trough-grown or supplied in another established format. Follow the instructions provided with the selected product because the handling and planting method can vary.
Instant Laurel units require a properly prepared trench, accurate levels, sufficient labour or lifting equipment and dependable irrigation during establishment.
When should planting be postponed?
Delay planting when the soil is:
- Frozen solid.
- Covered by snow.
- Waterlogged or saturated.
- Too dry and hard to prepare properly.
- Likely to be exposed to extreme heat immediately after planting.
Plants awaiting suitable conditions should be kept protected from frost, wind and drying. Bare roots must remain covered, while pot-grown and root-balled plants should be checked regularly for moisture.
Choose the right Laurel for your site
“Laurel” describes several evergreen hedging plants with different growth habits, soil preferences and levels of hardiness. Selecting the right variety before planting can reduce future problems with hedge width, exposure and maintenance.
Cherry Laurel
Cherry Laurel is a vigorous, broad-growing evergreen with large glossy leaves. It is commonly chosen for substantial privacy screens, shaded boundaries and longer hedge runs where relatively quick coverage is wanted.
Portuguese Laurel
Portuguese Laurel has smaller dark green leaves and attractive reddish young stems. It produces a finer, more formal-looking hedge and is particularly useful on chalky or alkaline soil where drainage is adequate.
Upright Laurel
Upright Laurel has a narrower, more upright growth habit than traditional Cherry Laurel. It is useful beside driveways, paths and boundaries where height is required but the available planting width is limited.
Compact Laurel
Compact Laurel is lower and more spreading. It suits low hedges, front gardens and smaller spaces rather than tall, fast privacy screening. Do not automatically use the planting spacing recommended for vigorous Cherry Laurel.
Sweet Bay Laurel
Sweet Bay Laurel, or Laurus nobilis, is botanically different from Cherry and Portuguese Laurel. It grows best in well-drained soil in a warm, sheltered position and is more vulnerable to severe frost and cold drying winds.
Where should you plant a Laurel hedge?
Most Laurel hedging grows well in full sun or partial shade. Cherry and Portuguese Laurel can also tolerate considerable shade, although growth may be slower where light is very limited.
Laurel generally prefers moist but well-drained ground. Avoid planting where water remains around the roots for prolonged periods. Persistently saturated soil excludes air from the root zone and can cause yellowing, poor growth and root decline.
Planting beneath established trees
Laurel can grow in shade beneath trees, but the new hedge may face competition from established roots as well as reduced light. The tree canopy can also create a rain shadow, meaning the soil stays dry even after apparently useful rainfall.
Prepare the wider planting strip carefully and check moisture below the surface rather than assuming rain has reached the Laurel roots.
Planting in heavy clay
Break up compacted soil across a wide area rather than creating a narrow planting hole surrounded by solid clay. If the site remains waterlogged, address the drainage problem before planting substantial Laurel plants.
Do not fill a clay planting hole with loose compost while leaving the surrounding ground compacted. This can create a pocket in which water collects around the roots.
Planting in sandy or free-draining soil
Sandy soil can drain and dry quickly. Incorporating suitable organic matter through the wider planting strip can improve moisture retention, but the hedge will still need close monitoring during dry weather.
Planting close to a fence or wall
Allow enough space for the hedge to develop and for future pruning access. A broad Cherry Laurel hedge will require more room than Upright Laurel or a low Compact Laurel hedge.
Remember that soil beside walls and fences may be drier because foundations, roof overhangs or neighbouring vegetation restrict the moisture available to the roots.
How far apart should Laurel hedge plants be spaced?
There is no single spacing suitable for every Laurel plant. The correct distance depends on the variety, plant height, root type and level of immediate coverage required.
Small bare-root or pot-grown plants are normally planted closer together than large pot-grown, root-balled or instant hedging plants. Use the plants-per-metre recommendation shown against the exact product size you are ordering.
| Plants per metre | Approximate distance between plant centres |
|---|---|
| 5 plants per metre | 20cm centres |
| 4 plants per metre | 25cm centres |
| 3 plants per metre | About 33cm centres |
| 2 plants per metre | 50cm centres |
| 1.5 plants per metre | About 67cm centres |
| 1.25 plants per metre | 80cm centres |
| 1 plant per metre | 1m centres |
How to calculate the number of Laurel plants needed
Measure the total length of the hedge in metres and multiply it by the recommended number of plants per metre.
For example, a 10m hedge planted at three plants per metre will require approximately 30 plants.
Allow for gates, paths, corners and any spaces where planting is not possible. For a large landscaping or commercial scheme, ask for a planting plan based on the selected variety, size and required finish.
Single or staggered double row?
A single row is normally suitable for established pot-grown, root-balled and instant Laurel. It creates a narrower hedge and is easier to maintain.
A staggered double row may be used with smaller plants where a broad, dense base is required. However, it needs more plants and more garden width. Do not simply double the single-row quantity without checking the recommendation for the selected product.
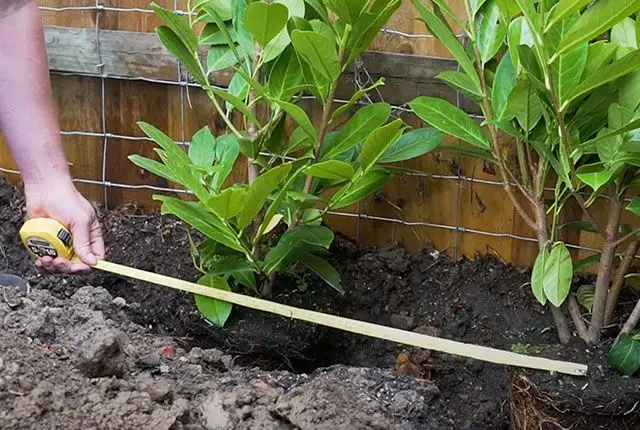
How to prepare the ground for a Laurel hedge
Good ground preparation is particularly important because a hedge forms a continuous line of plants that will occupy the same soil for many years.
- Mark the hedge line. Use canes and a string line to establish a straight and accurately positioned planting run.
- Remove weeds and grass. Clear perennial weeds and remove turf from the planting strip. Grass and weeds compete with a new hedge for water and nutrients.
- Prepare a wide strip. Dig or fork over a strip approximately 60–90cm wide where space allows. Break up compaction so new roots can spread beyond the original planting hole.
- Check drainage. Do not plant substantial Laurel into ground that remains continuously saturated. Improve drainage or reconsider the planting position before proceeding.
- Improve the soil where needed. Incorporate suitable well-rotted organic matter through the wider planting area rather than filling each hole with pure compost.
- Set out the plants. Place every plant along the line at the recommended centres before digging. This helps reveal measuring errors before planting begins.
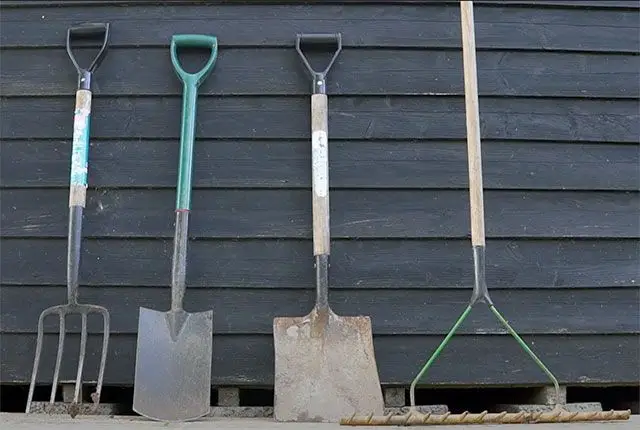
Tools and materials for planting Laurel
- Spade or planting shovel.
- Garden fork for loosening compacted soil.
- String line, canes and tape measure.
- Watering can or hose.
- Bucket or container for protecting bare roots.
- Secateurs for damaged roots or stems.
- Organic mulch such as composted bark.
- Stakes and suitable ties for larger plants where needed.
- Suitable lifting equipment for substantial root balls or instant units.
- RootGrow mycorrhizal fungi, where appropriate.
Wear suitable gloves and footwear, and arrange enough assistance before attempting to move large root-balled or instant plants.
How often should a newly planted Laurel hedge be watered?
Do not rely on a fixed instruction such as watering once or twice each week. The correct frequency changes with the weather, soil type, plant size, root type and level of exposure.
Instead, use a moisture-led approach:
- Water the hedge thoroughly immediately after planting.
- Use a trowel or your fingers to check the soil several centimetres below the surface.
- Check the original pot or field root ball as well as the surrounding soil.
- Water deeply when the root area is beginning to dry.
- Wait and recheck if the soil is still adequately moist.
- Do not continue watering automatically when the ground is already saturated.
Why the original root ball must be checked
A common establishment problem occurs when the surrounding soil is moist but the original root ball remains dry. Water can take the easiest route through loose backfill and bypass dense potting compost or a compact field root ball.
The reverse can also happen in heavy soil, where the root ball remains saturated long after the soil surface begins to look dry.

Weather conditions that increase watering demand
Check the hedge more frequently during:
- Hot or sunny weather.
- Long periods without rain.
- Strong or drying winds.
- Summer planting.
- Dry spring weather.
- Periods when the plants are making strong new growth.
Wind can remove moisture from evergreen foliage even when the temperature is not exceptionally high.
How soil type affects watering
Sandy and free-draining soil usually dries more quickly and may need more frequent attention. Heavy clay holds moisture for longer but can become waterlogged, particularly where the planting area has been compacted.
Use the actual condition of the root zone rather than the appearance of the surface to decide when water is needed.
Watering large and instant Laurel
Large root-balled and instant Laurel plants have a substantial area of evergreen foliage but initially depend on a limited root system. They therefore need particularly careful monitoring while new roots grow into the surrounding ground.
Where irrigation pipe is installed, test the full length of the system. Check that water reaches the beginning, middle and end of the hedge and that no blocked outlet leaves individual plants dry.
Watering during the second growing season
Continue monitoring the hedge through its second growing season, particularly during drought, hot weather and strong winds. The roots will have spread farther into the planting strip, but larger plants may still need additional water during prolonged dry periods.
Should a newly planted Laurel hedge be fed?
A newly planted hedge does not automatically need fertiliser once or twice every year. Feeding should depend on the existing soil, the age and condition of the plants and the strength of their growth.
Correct planting depth, drainage, watering and weed control are more important during initial establishment than forcing rapid top growth.
Where the soil is poor or young plants need support, apply a suitable balanced hedge feed as a spring top dressing, following the product instructions. Spread it over the root area rather than placing concentrated feed against the stem or roots.
Do not apply heavy fertiliser to a hedge that is severely dry, waterlogged or suffering from root damage. Correct the underlying moisture or drainage problem first.
Mulching a Laurel hedge
A 5–8cm layer of organic mulch can:
- Reduce moisture loss from the soil.
- Suppress competing weeds.
- Protect the soil surface from extremes of temperature.
- Gradually improve soil structure as organic material breaks down.
Keep the mulch clear of the stems and renew it as necessary.
Keep the planting strip free from grass and weeds
Grass and weeds compete directly with a young hedge for moisture and nutrients. Maintain a clear strip around the plants during establishment, taking care not to damage shallow Laurel roots with hoes or mechanical tools.
Common Laurel hedge planting mistakes
Using one spacing for every plant
Small bare-root plants and large root-balled specimens should not be planted at the same distance. Always use the recommendation for the selected product variation.
Planting too deeply
Burying the root collar or the base of the stems can restrict oxygen and encourage decline. Keep the original growing level even with the surrounding ground.
Digging a deep, narrow hole
A deep hole can settle and pull the plant below ground level, while narrow compacted sides restrict outward root growth. Prepare a wide planting area and avoid digging deeper than necessary.
Packing the backfill too tightly
The soil should be firm enough to support the plant and remove large air pockets, but not compressed into a hard, airless mass.
Allowing roots to dry before planting
Bare roots, pot root balls and field root balls can all be damaged by drying. Protect and water the plants before and during the planting process.
Watering only the surrounding soil
The original pot or field root ball can remain dry while the newly loosened soil around it appears moist. Direct water to both areas and check below the surface.
Following a fixed watering timetable
Weekly watering rules do not account for rainfall, soil, plant size, temperature or wind. Check moisture and adjust watering to the conditions.
Adding concentrated fertiliser to the planting hole
Fertiliser placed directly against the roots can cause damage and cannot correct poor drainage, compaction or inadequate watering.
Ignoring weeds and grass
A strip of grass around the hedge can take significant moisture away from newly establishing roots. Keep the planting area clear and mulched.
Frequently asked questions about planting Laurel hedges
What is the best month to plant Laurel hedging?
There is no single best month for every root type. Early autumn to early spring is normally the easiest planting period. Bare-root and root-balled Laurel must be planted during their dormant supply season, while pot-grown Laurel can be planted throughout the year if the soil is workable and sufficient water is available.
How deep should Laurel hedge plants be planted?
Plant Laurel at the same depth it was growing previously. The top of a pot-grown root ball should normally be level with the surrounding ground, and the root flare of a bare-root plant should remain close to soil level.
How many Laurel plants do I need per metre?
The number varies with the Laurel variety, height and root type. Small plants may require four or five per metre, while larger pot-grown or root-balled plants may need only one to three. Follow the recommendation displayed against the exact product size.
Can Laurel be planted in summer?
Pot-grown Laurel can be planted in summer, but it will need much closer moisture monitoring. Avoid planting during extreme heat or drought unless reliable irrigation and aftercare are available.
How often should I water Laurel after planting?
Check the soil and original root ball below the surface and water thoroughly when the root area is beginning to dry. Do not water automatically when the soil is already wet. Frequency will change according to rainfall, heat, wind, soil type and plant size.
Should compost be added when planting Laurel?
Suitable well-rotted organic matter can help improve poor soil, but it should be incorporated through the wider planting strip rather than used to create a small pocket of pure compost around each plant.
Should Laurel roots be loosened before planting?
Loosen only tightly circling roots on pot-bound plants. Do not unnecessarily pull apart a healthy pot root ball, and never break up an intact field-grown root ball.
Does Laurel need RootGrow?
RootGrow is optional but can be applied at planting where suitable. Follow the product instructions and ensure it contacts the roots directly.
Should Laurel be fed immediately after planting?
Concentrated fertiliser should not be placed directly against the roots. Concentrate first on planting depth, watering, drainage and weed control. A balanced spring top dressing can be applied later where the soil or plant condition indicates it is needed.
Why are the leaves yellow after planting?
Newly planted Laurel can yellow because the root ball is too dry, too wet, planted too deeply or disturbed during planting. Check moisture within the original root ball and surrounding soil before applying fertiliser.
Continue caring for your Laurel hedge
Successful planting is the first stage of establishing a healthy hedge. Our complete Laurel Hedging Care Guide covers ongoing watering, feeding, mulching, pruning, growth rates and common leaf problems.
You can also shop Laurel hedging plants and compare Cherry Laurel, Portuguese Laurel, Upright Laurel, Compact Laurel and Sweet Bay in the available sizes and root types.