
Hedging care & growing guide
Oleaster Hedging Care Guide: Planting, Spacing and Pruning
Oleaster hedging is an adaptable evergreen hedge that establishes best in well-drained soil, with thorough watering while its roots spread beyond the original pot and light formative pruning to build dense growth. It is particularly useful for exposed and coastal positions. If you are still choosing plants, you can view our Oleaster hedging plants before using this guide to plan the planting and aftercare.
This guide covers Oleaster planting, spacing, watering, feeding, pruning, growth rate, seasonal maintenance and the common reasons an Elaeagnus hedge may yellow, lose leaves or establish slowly. It covers both the standard silver-green Oleaster and the more decorative gold-edged ‘Gilt Edge’ cultivar currently represented in our range.
Oleaster becomes tolerant of dry and exposed conditions once established, but that toughness should not be mistaken for an ability to cope with a dry root ball immediately after planting. Good drainage, correct planting depth and consistent moisture during establishment make a greater difference than heavy feeding.
Expert nursery advice
Gwynne's Grower's Tip
Oleaster is a plant I particularly like for windy and coastal gardens because, once established, it copes with conditions that can make many evergreen hedges struggle. The important part is not to assume that a tough mature Oleaster is a tough newly planted Oleaster. Keep the original root ball evenly moist while the roots establish into the surrounding soil, make sure the ground drains properly and start shaping the sides while the hedge is young. That gives you a much denser hedge than simply letting it race upwards.
From our nursery
Visit our Oleaster hedges

Oleaster Hedge
Standard Oleaster is the one I would normally choose when the priority is a dependable evergreen screen for an exposed, windy or coastal position. The silver-green leaves give it more character than a plain dark-green hedge and the pale undersides become particularly noticeable when the foliage moves in the wind. It is also the faster of our two current Oleaster choices, so it suits larger boundaries where useful screening is important.

Oleaster Gilt Edge Hedge
I would choose ‘Gilt Edge’ when the hedge needs to be a feature as well as a screen. Its dark-green leaves have distinctive yellow margins, so it gives a warmer and more ornamental effect than standard Oleaster. Growth is steadier rather than exceptionally fast, which can be useful for a medium-height formal or semi-formal hedge where colour and a tidy outline matter more than achieving maximum height quickly.
Not sure which Oleaster hedge to choose?
Compare the available plants, formats and starting sizes in the complete range.
Explore our complete Oleaster hedging rangeOleaster hedge quick-care summary
| Botanical name | Elaeagnus × submacrophylla (syn. E. × ebbingei) |
|---|---|
| Plant type | Woody evergreen hedging shrub |
| Evergreen or deciduous | Evergreen |
| Typical growth rate | Standard 30–60cm/year; Gilt Edge 20–40cm/year |
| Preferred position | Sun or partial shade; coastal and exposed sites |
| Soil | Most well-drained soils; avoid persistent waterlogging |
| Watering | Water thoroughly during establishment and dry spells |
| Pruning period | Main trim in spring; light later trim if required |
| Feeding | Balanced spring feed where required |
| Hardiness | RHS H5 |
| Typical hedge height | Commonly maintained around 1.5–3m |
| Planting season | Pot grown year-round when conditions are suitable |
| Root types commonly available | Pot grown |
About Oleaster hedging
Oleaster is a dense broadleaved evergreen hedge valued for year-round foliage, fragrant autumn flowers and an unusual ability to cope with dry, windy and coastal positions once established. The two current Hedging Plants Direct choices are the silver-green standard Oleaster and the slower-growing, gold-edged ‘Gilt Edge’ cultivar.
Oleaster belongs to the Elaeagnaceae family. The plant traditionally sold in the UK as Elaeagnus × ebbingei is now accepted botanically as Elaeagnus × submacrophylla, although the older name remains extremely common in nurseries, gardens and search queries.
Standard Oleaster forms a bushy evergreen shrub with leathery metallic green to silver-green leaves and conspicuously silvery undersides. Small, strongly scented pale flowers appear in autumn and may be followed by small fruits if flowering growth is retained.
It is especially useful as hedging because it combines evergreen cover with a tolerance of wind, coastal conditions and comparatively dry soil once established. The foliage also gives a softer, more varied appearance than many conventional dark-green evergreen screens.
Standard Oleaster
Our standard Oleaster Hedge is the faster-growing choice in the current range. It is useful where screening, exposure tolerance and relatively rapid establishment are the main priorities.
Oleaster ‘Gilt Edge’
Oleaster ‘Gilt Edge’ has dark-green leaves with conspicuous yellow margins. Its growth is generally steadier, so it works particularly well where the hedge is intended to provide ornamental colour as well as screening.
Choosing the right Oleaster hedge
Choose standard Oleaster where relatively fast evergreen screening is the priority and ‘Gilt Edge’ where stronger foliage colour and a more ornamental medium-height hedge are preferred. Both tolerate exposed and coastal conditions, but neither should be planted into persistently waterlogged soil.
The main decision within our current Oleaster range is whether you want the faster-growing silver-green appearance of standard Oleaster or the brighter gold-edged foliage of ‘Gilt Edge’.
| Choice | Best suited to | Typical HPD growth rate | Key difference |
|---|---|---|---|
| Standard Oleaster | Privacy, exposed boundaries, coastal gardens and larger evergreen screens | 30–60cm per year in favourable conditions | Faster growth with silver-green foliage and pale undersides |
| Oleaster ‘Gilt Edge’ | Decorative boundaries, formal or semi-formal hedging and gardens needing year-round foliage colour | 20–40cm per year in favourable conditions | Dark-green leaves edged with yellow; slower and more ornamental |
For privacy
Standard Oleaster is generally the better starting point when relatively rapid screening is the main objective. ‘Gilt Edge’ can also form a dense hedge but normally puts on extension growth more slowly.
For exposed and coastal sites
Oleaster is particularly useful where wind and salt exposure make establishment difficult for less tolerant evergreen plants. Young plants still need careful watering and may benefit from temporary protection on extremely exposed sites until new roots have grown into the surrounding soil.
For shade
Oleaster tolerates partial shade and established plants can tolerate quite low-light situations. For the densest hedge, however, avoid unnecessary competition from overhanging trees and keep the planting strip free from established roots and weeds where practical.
For difficult soil
Oleaster is tolerant of a wide range of soil textures provided excess water can drain away. Dry or relatively poor ground is less problematic once the hedge is established than permanently wet, compacted soil. Some Elaeagnus forms can develop chlorotic yellow foliage on shallow chalky ground.
When to plant Oleaster hedging
The Oleaster plants currently sold by Hedging Plants Direct are pot grown, so they can be planted throughout the year whenever the soil is workable and reliable watering is available. Autumn through spring is usually easiest because cooler conditions reduce water stress while new roots establish.
Because the current Oleaster range is pot grown, planting is not restricted to a traditional bare-root season. The best planting date is therefore determined more by soil and weather conditions than by the calendar.
Best conditions
Autumn and spring are particularly convenient because the soil is normally moist, temperatures are moderate and the plants lose less moisture than during hot summer weather. Winter planting is also possible during mild periods if the soil is neither frozen nor saturated.
Delay planting when:
- the ground is frozen or covered by snow;
- the soil is waterlogged or structurally damaged by working it wet;
- the site is experiencing drought or extreme heat;
- strong drying winds make newly planted evergreens difficult to keep hydrated.
Summer planting can work successfully, but only where the plants can be watered thoroughly before planting and monitored closely afterwards. Do not plant a dry pot and assume surface watering will re-wet the centre of the root ball.
Where to plant an Oleaster hedge
Plant Oleaster in free-draining soil in sun or partial shade. It is unusually useful for coastal, windy and exposed sites and will tolerate relatively dry soil once established, but persistent waterlogging, severe compaction and intense root competition can all cause poor establishment.
Light
Full sun or partial shade suits Oleaster well. It can tolerate considerable shade, but a hedge in very low light may become less dense, particularly where shade is combined with competition from mature trees.
Exposure and coastal gardens
Oleaster is one of the more dependable broadleaved evergreens for windy and coastal situations. Its leathery leaves cope well with exposure once the plant is established. Newly planted hedges still have a restricted root system, so drying winds can create water stress before the roots have spread into the surrounding ground.
Soil and drainage
Most loam, sandy, clay and chalk-influenced soils can be suitable if drainage is adequate. The important exception is persistently waterlogged ground. If water remains in a trial hole after prolonged dry weather or the site sits wet for long periods in winter, investigate the drainage rather than simply adding compost to each planting hole.
Elaeagnus can grow across a broad pH range, although some forms may become chlorotic on shallow chalky soil.
Walls, fences and boundaries
Do not squeeze the planting line tightly against a solid fence or wall. Allow enough room for the hedge to develop to its intended width and for future access with secateurs or hedge-cutting equipment. A hedge that cannot be maintained from the rear often becomes unnecessarily broad on the garden side.
Before excavating a long trench, identify underground services and make sure the mature hedge will not obstruct paths, gates, visibility splays or neighbouring access.
Prepare the planting area
Prepare the whole hedge line rather than improving isolated pockets. Remove perennial weeds, relieve compaction, correct drainage problems and water dry pot-grown root balls before planting. Organic matter can improve poor soil structure, but concentrated fertiliser should not be placed directly against newly disturbed roots.
- Clear the planting strip. Remove perennial weeds, grass and competing vegetation along the complete hedge line rather than clearing only a small circle around each plant.
- Check drainage. Investigate persistent standing water before planting. Adding rich compost to a poorly drained hole does not solve the underlying problem.
- Loosen compacted ground. Fork or cultivate a broad strip so developing roots can move beyond the original pot.
- Use a trench where useful. A continuous trench can make it easier to set a straight hedge at close centres. Individual holes are equally suitable where soil conditions are uniform.
- Improve soil selectively. On poor ground, mix suitable organic soil improver through the excavated soil rather than creating a completely different compost-filled pocket around the roots.
- Water dry pots before planting. The root ball should be evenly moist before it goes into the ground.
- Use mycorrhizal fungi correctly. If using Rootgrow mycorrhizal fungi, apply it according to the product instructions so that it contacts the roots.
- Avoid concentrated fertiliser in the hole. Establishment depends first on drainage, planting depth, moisture and healthy root growth.
Where the soil needs additional organic matter, our Hedge Planting Compost can be used as a soil conditioner rather than as a substitute for the existing soil.
How to plant an Oleaster hedge
Plant Oleaster at the same depth it was growing in its container, spread tightly circling roots where practical, firm the soil without compacting it and water the entire root zone thoroughly. Set all plants out at the correct spacing before digging so the hedge remains even.
- Mark a straight planting line. Use a string line and measure the correct centre-to-centre spacing for the plant size being used.
- Set the plants out first. Position every pot before digging so that the first and last plants sit sensibly at the ends of the run and the spacing remains even.
- Dig the trench or holes. Make them broad enough for the root system but no deeper than the existing root ball.
- Remove the pot and inspect the roots. Loosen tightly circling outer roots gently where necessary without breaking the root ball apart excessively.
- Set the planting depth. The top of the existing root ball should finish level with the surrounding soil. Avoid burying the stem.
- Backfill with the excavated soil. Work soil around the sides of the root ball and firm gently by hand or foot without compacting wet ground.
- Water thoroughly. Apply enough water to wet both the original root ball and the surrounding soil. This settles soil around the roots as well as supplying moisture.
- Mulch the planting strip. Apply mulch over moist soil while leaving a clear gap around the stems.
- Stake only where required. Large plants in very exposed ground may need temporary support to prevent wind rock. The objective is a stable root ball, not a permanently rigid plant.
Recheck the hedge after the first thorough watering. If loose soil has settled, top it up without burying the root collar.
Oleaster hedge spacing and plants per metre
Current Hedging Plants Direct Oleaster spacing guidance is size-specific: 40–80cm pot-grown plants are shown at 3 plants per metre, approximately 33cm centres, while 80–125cm plants are shown at 2 per metre, approximately 50cm centres. Use the recommendation for the exact size being ordered.
Oleaster should not be planted using one universal spacing figure. The current Hedging Plants Direct category spacing chart changes the density according to the height of the plants.
| Pot-grown plant size | Plants per metre | Approximate centre-to-centre spacing |
|---|---|---|
| 40–60cm | 3 per metre | 33cm |
| 60–80cm | 3 per metre | 33cm |
| 80–100cm | 2 per metre | 50cm |
| 100–125cm | 2 per metre | 50cm |
Why larger plants can be spaced further apart
Larger Oleaster plants already have a broader framework, so fewer plants are required to fill the same metre of hedge. Planting more closely than necessary does not automatically produce a better mature hedge and can increase cost and competition between root systems.
What about 20–40cm Gilt Edge plants?
The current Gilt Edge product includes a 20–40cm size, but the public Oleaster category spacing chart begins at 40–60cm. Check the current product recommendation before ordering rather than inventing a density from the figures for another size.
Single or double row?
A single row is the normal layout for the pot-grown Oleaster sizes in this range and creates a manageable evergreen hedge without unnecessary width. Only use a staggered double row where there is a specific landscape requirement for a broader belt and the quantity has been calculated for that design.
Watering and establishing Oleaster hedging
Water every Oleaster thoroughly after planting and monitor the root zone closely through its first growing season. Although established Oleaster tolerates relatively dry conditions, a newly planted evergreen still loses water through its leaves before its roots have spread beyond the original container.
Water the complete root zone immediately after planting, even when rain is forecast. This settles soil around the roots and ensures the original pot root ball begins establishment evenly moist.
The first growing season
Check moisture below the soil surface rather than watering by calendar. Push a finger or small trowel into the soil close to the root ball and check both the original potting compost and the surrounding ground. Water thoroughly when the root zone is beginning to dry, then allow excess water to drain.
Hot weather, sandy soil, wind, walls and competition from established trees all increase water demand. Heavy clay holds moisture for longer, so the same irrigation schedule can become excessive.
Winter watering
Oleaster remains evergreen and continues losing some moisture through its leaves in winter. Recently planted hedges in dry, windy positions can therefore need water during mild frost-free periods. Do not water frozen or already saturated ground.
Signs the hedge may be too dry
- drooping or dull foliage;
- brown, crisp leaf margins;
- premature yellowing and leaf drop;
- weak or stalled new growth;
- a dry original root ball even when surrounding soil feels damp.
Signs the roots may be too wet
- persistent yellowing combined with wet soil;
- little new growth despite regular feeding;
- soft or deteriorating roots;
- soil remaining saturated for long periods after rain.
Mulching helps reduce evaporation and weed competition. Our Hedge Bio Mulch can be applied over moist soil, leaving the stems clear.
For longer hedge lines, a properly installed hedge irrigation system can help distribute water evenly. Even with irrigation, check soil moisture manually and adjust use for rainfall and temperature.
How and when to feed an Oleaster hedge
Oleaster normally needs only moderate feeding. Where growth is weak or the soil is poor, apply a balanced general hedge fertiliser in spring to moist soil. Feeding cannot correct drought, waterlogging, deep planting or root damage, so investigate those causes first when a hedge is struggling.
Spring feeding
Early to mid-spring is the most useful time for routine feeding because nutrients are available as active growth begins. Apply a balanced fertiliser according to its label over moist, weed-free soil around the root zone rather than piling it against the stems.
Our Hedge Feed is a balanced granular 7-7-7 fertiliser suitable for this purpose.
When not to feed
Do not automatically add fertiliser because an Oleaster has yellow leaves or has stopped growing. Check moisture, drainage, planting depth and root condition first. Fertiliser applied to a drought-stressed or waterlogged root system will not solve the underlying problem.
Late-season feeding
Avoid forcing soft new growth with heavy high-nitrogen feeding late in the season. New growth needs time to mature before cold and exposed winter weather.
Mulch and organic matter
An organic mulch can improve the root environment by suppressing weeds, conserving moisture and gradually contributing organic matter. Apply mulch to damp soil but keep it away from the main stems.
How and when to prune Oleaster hedging
For the main formative or corrective cut, prune Oleaster in mid to late spring as active growth begins. Formal hedges can receive a second light trim later in summer if required. Keep the base slightly wider than the top and avoid repeatedly removing lower growth if you want a dense hedge.
Oleaster is naturally bushy and does not need severe annual pruning. The objective with a hedge is to guide that growth into a dense framework rather than continually cutting it back hard.
Young Oleaster hedges
Trim long or straggly side shoots lightly from an early stage to encourage branching. Allow the leading shoots to continue upwards until the hedge approaches its intended height, then begin controlling the top.
Shape the hedge so the base is at least as wide as, and preferably slightly wider than, the top. This allows more light to reach the lower foliage and reduces the risk of a thin, bare base.
Established hedges
Carry out the main shaping in mid to late spring. A formal hedge making strong extension growth can be lightly trimmed again later in summer. Where the fragrant autumn flowers are important, keep late-season trimming light because removing developing shoots may reduce flowering.
How much should be removed?
For routine maintenance, remove the soft extension growth needed to restore the intended outline rather than cutting deeply into the framework each year. Secateurs can give a particularly clean finish where individual large leaves would otherwise be sliced by a hedge trimmer.
Renovating an overgrown Oleaster hedge
Oleaster grown as hedging tolerates substantial trimming, but renovation of a large neglected hedge is safer when staged. Reduce part of the height or one side first, encourage strong replacement growth, then complete the reduction over subsequent seasons. Maintain watering during dry weather after major pruning.
Check for nesting birds
Always inspect the hedge carefully before cutting. If an active bird nest is present, postpone work around it until the nest is no longer in use.
Oleaster growth rate and eventual size
Standard Oleaster is currently rated by Hedging Plants Direct at approximately 30–60cm of annual extension growth in favourable conditions, while ‘Gilt Edge’ is rated at 20–40cm. Growth is slower during establishment and on dry, shaded, compacted or poorly drained sites.
| Oleaster type | Typical qualified growth rate | Management |
|---|---|---|
| Standard Oleaster | Approximately 30–60cm per year in favourable conditions | Useful for relatively fast evergreen privacy and larger screens |
| Oleaster ‘Gilt Edge’ | Approximately 20–40cm per year in favourable conditions | Steadier growth suits ornamental medium-height hedging |
Why growth varies
These figures describe potential extension growth, not a guarantee. Newly planted Oleaster often spends part of its first season establishing roots rather than producing maximum shoot growth. Drought, waterlogging, severe shade, competition, poor soil structure and repeated hard pruning can all reduce annual extension.
How large can Oleaster become?
Unclipped Elaeagnus × submacrophylla can develop into a substantial shrub, with the RHS giving an eventual height and spread of approximately 2.5–4m. Hedging Plants Direct product attributes currently place Oleaster in a category capable of reaching up to about 5m.
As a managed garden hedge it can readily be maintained lower than its natural size. Around 1.5–3m is a useful working range for many privacy and boundary situations, provided pruning begins before the hedge becomes excessively broad.
Oleaster seasonal care
Oleaster is relatively low maintenance once established. Spring is the main period for feeding and formative pruning, summer requires moisture monitoring and occasional shaping, autumn is a good planting period, and winter care centres on checking recently planted hedges during dry, windy weather.
| Season | Main Oleaster care |
|---|---|
| January–February | Plant pot-grown Oleaster in mild workable soil. Check newly planted hedges after strong winds and water on frost-free days if the root zone is genuinely dry. |
| March–April | Mulch weed-free ground, apply a balanced spring feed where required and begin formative or corrective pruning as active growth starts. |
| May–June | Monitor new growth for Elaeagnus sucker and check moisture carefully during dry spells. Continue light formative work where necessary. |
| July–August | Maintain watering during hot or windy periods. Give formal hedges a light shaping trim if necessary, but avoid unnecessary heavy cutting. |
| September–October | Enjoy fragrant flowers on lightly trimmed plants. Begin autumn planting when soil moisture improves and temperatures moderate. |
| November–December | Continue planting during suitable weather. Check mulch, wind-rock and drainage around recently planted hedges rather than routinely feeding or pruning. |
The calendar should always be adjusted for actual weather. A dry April may require more watering than a wet July, and waterlogged winter soil should be left until conditions improve.
Oleaster pests, diseases and common problems
Oleaster is generally resilient, but Elaeagnus sucker is a characteristic pest and honey fungus, coral spot and fungal leaf spot can occur. Newly planted hedges are more commonly troubled by moisture, drainage or establishment stress, so diagnose the root environment before assuming yellow or brown foliage is a disease.
Elaeagnus sucker
Elaeagnus sucker is the most characteristic pest to check. Large populations can distort young leaves and produce sticky honeydew, which may become covered by black sooty mould. The insects are usually more unsightly than dangerous and often have little effect on the overall vigour of an established plant.
Where damage is light, tolerate it and encourage natural predators. Avoid automatically spraying. Heavily distorted individual shoots can be removed where this can be done without causing more damage than the pest itself.
Yellow leaves
Yellowing is a symptom rather than a diagnosis. Check the root zone first.
- Wet soil: poor drainage or overwatering may be restricting oxygen around the roots.
- Dry original root ball: surrounding soil may feel damp while the original potting compost remains dry.
- Recently planted hedge: some older foliage may be shed while the roots establish.
- Shallow chalky soil: some Elaeagnus plants can develop chlorosis in these conditions.
Correct the cause before adding extra fertiliser.
Brown or scorched leaves
Brown tips or margins on a recently planted hedge are commonly associated with a dry root ball, hot weather, cold drying wind or establishment stress. Check moisture several centimetres below the surface and inspect more than one plant along the hedge before deciding on treatment.
Leaf drop after planting
Some leaf loss can follow planting stress, particularly if an evergreen root ball has dried. If stems remain alive and buds or new shoots are developing, recovery is possible. Continued widespread dieback, soft roots or persistently saturated soil requires closer investigation.
The hedge is not growing
A newly planted Oleaster may make modest top growth while roots establish. If there is still little progress after a full growing season, check planting depth, soil moisture, drainage, root competition, weed growth and compaction. Feeding should come after these basic conditions have been assessed.
Sparse growth at the base
Keep the hedge slightly wider at the base than the top and trim side shoots while plants are young. An over-wide top can shade the lower branches and gradually produce a bare base. Severe shade from neighbouring plants can have the same effect.
Fungal leaf spot and coral spot
Fungal leaf spots can produce localised lesions on the foliage, while coral spot is associated mainly with dead or weakened woody growth. Remove dead and badly affected material with clean tools, reduce avoidable stress and avoid leaving large quantities of diseased pruning debris around the hedge.
Honey fungus
Honey fungus should be considered where apparently established woody plants show progressive dieback accompanied by root or basal decay, white fungal material beneath the bark, characteristic black rhizomorphs or honey-coloured mushrooms. Because other root problems can look similar, obtain a reliable diagnosis before removing neighbouring healthy plants.
Oleaster wildlife and environmental value
A mature Oleaster hedge provides evergreen shelter and dense cover throughout the year. Its small fragrant autumn flowers can be visited by insects late in the season, while fruit may develop where flowering growth is retained. Frequent clipping reduces these flowering and fruiting opportunities.
The strongest wildlife benefit of Oleaster as a hedge is structural. Dense evergreen foliage creates year-round shelter and potential nesting cover at times when deciduous hedges have lost their leaves.
The small fragrant flowers appear unusually late, generally in autumn, and can provide an additional floral resource when relatively few woody hedge plants are flowering. Small fruits can follow where pollination occurs and flowering growth has not been removed by clipping.
If wildlife value is a priority, consider maintaining a slightly less formal section of hedge or reducing unnecessary late-season trimming so more flowers remain. A highly formal hedge that is clipped repeatedly will naturally flower and fruit less.
Always inspect dense foliage carefully for active bird nests before cutting. If a nest is in use, postpone work around it until breeding has finished.
Oleaster care by root type
The current Hedging Plants Direct Oleaster and Oleaster ‘Gilt Edge’ products are pot grown, so this guide does not need bare-root, root-balled or instant-hedge instructions. Pot-grown establishment depends particularly on preventing the original container root ball from drying after planting.
| Current root type | At planting | Establishment priority | Common mistake |
|---|---|---|---|
| Pot grown | Water the pot first if dry, remove the container, inspect circling roots and plant at the existing compost level | Keep both the original root ball and surrounding soil evenly moist while new roots spread | Watering only the surrounding soil while the original pot root ball remains dry |
Pot-grown plants can be planted throughout the year in suitable weather, but this flexibility increases the importance of aftercare during warm periods.
Do not add bare-root or root-ball handling instructions unless those formats are added to the live Oleaster range in future. If availability changes, update this section at the same time as the Quick Care summary and spacing table.
Frequently asked questions about Oleaster hedging
How far apart should I plant Oleaster hedging?
Current Hedging Plants Direct guidance is 3 Oleaster plants per metre, about 33cm centres, for 40–80cm pot-grown plants. Larger 80–125cm plants are shown at 2 per metre, about 50cm centres. Always use the density for the exact plant size being ordered rather than applying one universal Oleaster spacing.
When is the best time to plant an Oleaster hedge?
Pot-grown Oleaster can be planted throughout the year whenever the ground is workable and you can provide adequate water. Autumn through spring is generally easiest because cooler, moister conditions reduce establishment stress. Avoid planting into frozen or waterlogged soil and delay summer planting during extreme heat or drought.
How fast does an Oleaster hedge grow?
Standard Oleaster is currently rated by Hedging Plants Direct at approximately 30–60cm of annual growth in favourable conditions. Oleaster ‘Gilt Edge’ is steadier at around 20–40cm. Newly planted hedges may grow more slowly while the root system establishes, particularly on dry, shaded, compacted or poorly drained sites.
When should I prune an Elaeagnus hedge in the UK?
Carry out the main formative or corrective pruning of Oleaster in mid to late spring, once the worst frost risk has passed and growth is becoming active. A formal hedge can receive a second light trim later in summer. Keep late trimming light if you want to retain the fragrant autumn flowers.
Can Oleaster be hard pruned?
Established Oleaster used as hedging can tolerate substantial trimming, but a large neglected hedge is safest renovated in stages. Reduce one side or part of the height first, allow replacement growth to develop and complete the work over following seasons. Maintain watering during dry weather while the hedge recovers.
Will Oleaster grow in shade?
Yes. Oleaster grows well in partial shade and can tolerate quite shaded positions, although the densest growth is normally achieved where there is reasonable light. Under mature trees, dry soil and root competition can be more limiting than shade itself, so check moisture and keep the planting strip free from competing weeds.
Is Oleaster good for coastal gardens?
Yes. Oleaster is particularly useful for exposed and coastal gardens because established plants tolerate dry soil and salt-laden winds better than many broadleaved evergreens. Newly planted hedges still need regular moisture while the roots establish and may need temporary support or shelter on an exceptionally windy site.
What soil does Oleaster prefer?
Oleaster grows in a wide range of soils provided they drain freely. Loam, sandy, clay and chalk-influenced soils can all be suitable, but persistent waterlogging should be avoided. Some Elaeagnus forms may develop chlorotic yellow foliage on shallow chalky ground, so soil conditions should be investigated if yellowing persists.
How often should I water a newly planted Oleaster hedge?
Water according to soil moisture rather than a fixed timetable. Soak the complete root zone after planting, then check both the original pot root ball and surrounding soil regularly during the first growing season. Water thoroughly when the root zone begins to dry, but do not keep heavy soil continuously saturated.
Why are my Oleaster leaves turning yellow?
Yellow Oleaster leaves are most commonly a sign that the root environment needs checking. The soil may be too wet, the original root ball may have dried, or a recently planted hedge may be adjusting after transplanting. Some plants can also become chlorotic on shallow chalky soil. Diagnose moisture and drainage before adding fertiliser.
Why are my newly planted Oleaster leaves turning brown?
Brown or crisp foliage after planting is commonly associated with the root ball drying, hot weather, cold drying wind or general establishment stress. Check moisture below the surface and within the original container root ball. If the soil is already saturated, do not add more water until drainage and root condition have been assessed.
How tall does Oleaster grow?
Unpruned Oleaster can become a substantial shrub. The RHS gives an eventual size of about 2.5–4m, while Hedging Plants Direct classifies its Oleaster products as capable of reaching up to around 5m. As a hedge it can readily be maintained around 1.5–3m with regular formative and maintenance pruning.
What is the difference between standard Oleaster and Oleaster ‘Gilt Edge’?
Standard Oleaster has silver-green evergreen foliage with silvery undersides and is the faster current HPD option at approximately 30–60cm growth per year. ‘Gilt Edge’ has dark-green leaves with conspicuous yellow margins and grows more steadily at around 20–40cm. Choose primarily according to desired foliage colour and growth speed.
Does Oleaster flower?
Yes. Oleaster produces small but noticeably fragrant pale flowers, unusually for a hedge, in autumn. Small fruits may follow where flowers are pollinated and retained. Repeated close trimming can remove flowering shoots, so leave some growth untrimmed if flowers and wildlife value are more important than a perfectly formal outline.
More Oleaster questions
Useful answers from our Oleaster hedging knowledge base.
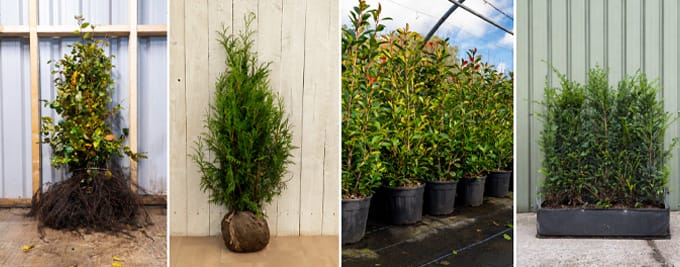
What Are the Different Hedging Root Types?
Bare root, root ball, pot-grown and instant hedging suit different budgets, planting times and levels of initial coverage. Understanding how each is supplied makes it easier to choose the right format for your project.